
The Shipments tab is where you will input all of the shipments to your customers.
Subtabs: Shipments, Shipping Report
Shipments
Table
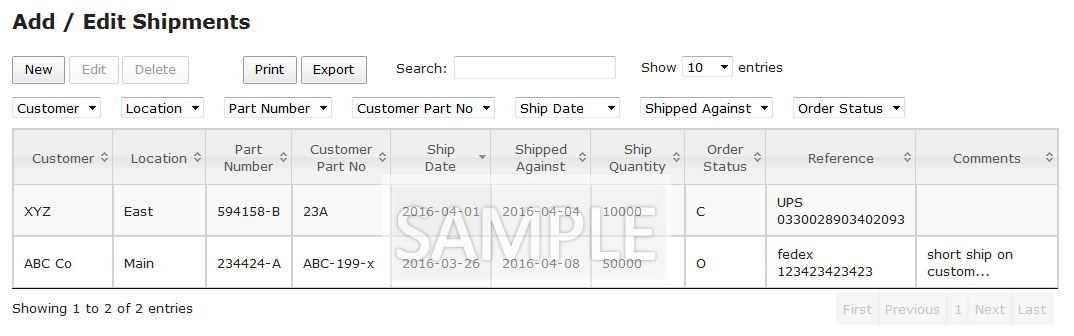
Please see the Interacting with Tables section of this manual to learn how tables work. In this page, we will deal with the specific data in this table.
The columns are, for the most part, self explanatory, but we’ll review them for informational purposes:
- Customer: The customer name. We use the nickname you have given the customer for brevity.
- Location: The location the customer has designated for shipping. Again, the assigned nickname is used.
- Customer Part No: The customer’s part number as specified in their order.
- Part Number: Your internal part number that corresponds to the customer’s part number
- Ship Date: The date of this shipment.
- Shipped Against: The order date that this shipment was shipped against.
- Ship Qty: The quantity shipped.
- Order Status: “O” = Open, “C” = Closed. An order remains open until it has been filled. Once you have completed fulfillment of the order, the status moves to Closed.
- Reference: The shipping identification information supplied by the carrier.
- Comments: Any comments you have entered regarding this line item.
Let’s move on to your interaction with the table:
- To create a new Shipment:
- Click the “New” button, then follow the Form instructions below.
- To edit an existing Shipment:
- Select the row you wish to edit, then click the “Edit” button. Follow the Form instructions below.
- To Delete an existing Shipment:
- Select the row you wish to delete, then click the “Delete” button. Follow the Form instructions below.
Now we’ll look at each button action individually:
Create a New Shipment
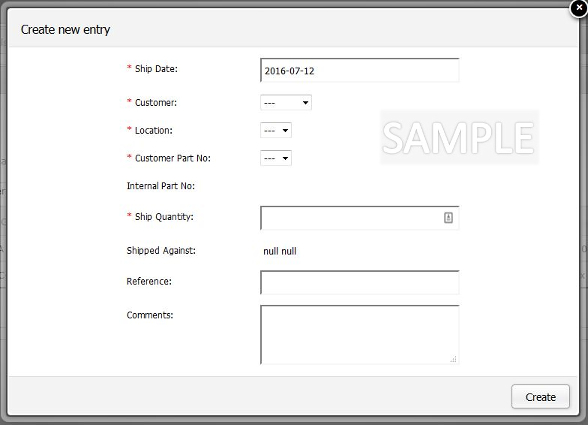
This is the Create new entry form to add a New Shipment. A description for each field follows:
- Ship Date: Defaults to today. Click in the field if you wish to select a different Ship Date using the popup calendar.
- Customer: Select the customer for the Shipment.
- Location: Select the location your customer designated for this Shipment. If your customer has only one shipping location, this field will auto-populate.
- Customer Part No: Select the part (by your customer’s part number) for this Shipment. If this customer location only orders one part from you, this field will auto-populate.
- Internal Part No: Automatically displays your part number for this order as confirmation. This field is not editable.
- Ship Quantity: The quantity of this Shipment. There are special cases noted on Ship Quantity below.
- Shipped Against: This read-only field is automatically populated with the next open date / quantity for this customer / location / part as confirmation. If this is not the correct date and open quantity for this customer / location / part, see below for further instructions.
- Release Number: The Release Number of the Purchase Order Number, when your customer sends you revisions.
- Reference: Enter any information that identifies this shipment (usually a tracking number from the carrier.)
- Comments: Any comments you wish to add to this Shipment can be entered here.
Once you have completed entering the data for this Shipment, click “Create” and you’re all done! You will be returned to the table view, and your new line item will be momentarily highlighted in the table.
To cancel the Entry and make no changes, click the “X” at the top right corner of the window, or hit “ESC” on your keyboard.
Edit an Existing Shipment
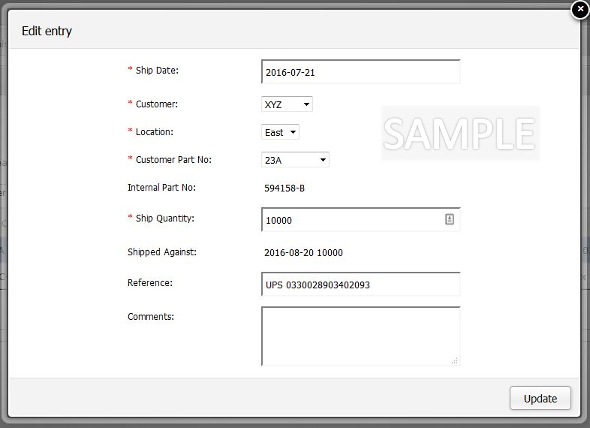
This is the Edit Entry form to edit an Existing Shipment. For a description of each field, read the Add a New Shipment text above.
- To begin an Edit on an Existing Shipment, first you must click on the table row you wish to edit. Once a row is highlighted, the Edit button will become active.
- The form will automatically populate with all of the information from the row you selected. Edit the field that you wish to change and click “Update” to complete the edit. You will be returned to the table view, and your edited line item will be momentarily highlighted in the table.
- To cancel the Edit and make no changes, click the “X” at the top right corner of the window, or hit “ESC” on your keyboard.
Delete a Shipment
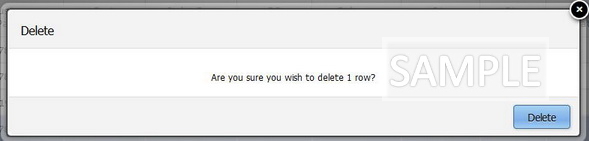
To Delete a Shipment, you must first click on the table row you wish to Delete. Once a row is highlighted, the Delete button will become active.
The Delete dialog will appear to confirm that you wish to delete this row. Click the “Delete” button and you will be returned to the table. The row no longer exists.
- To cancel the deletion and leave the record in the table, click the “X” at the top right corner of the window, or hit “ESC” on your keyboard.
Notes regarding Shipping Quantities
Shipments are placed against an Open Order in the PiQ System. Order Quantities and Shipping Quantities must ultimately match up to clear the Order queue properly.
- Shipping Quantity Scenarios
- Ship Quantity equal to Open Quantity: the Shipment is accepted and the Order is Closed.
- Ship Quantity is less than the Open Quantity: The Shipment will be accepted, but it will leave the Order in Open Status until it is filled. A prompt will alert you to this condition.
- Shipping less than the Open Quantity is generally used when you are making a partial shipment against an order with the intent of shipping the remaining Open Quantity at a later date.
- If you wish to ship less than Open Quantity AND you wish to close the order at the reduced quantity, you must first change the order to the reduced quantity, then ship the total to close it out.
- Ship Quantity is greater than the Open Quantity:
- You cannot enter a Shipping Quantity greater than the next Open Quantity. If you are overshipping, you must first increase the Order Quantity so that Open Quantity is equal to the Shipping Quantity.
Shipping Report
The Shipping Report tab is where you view everything that needs to be shipped.
Table
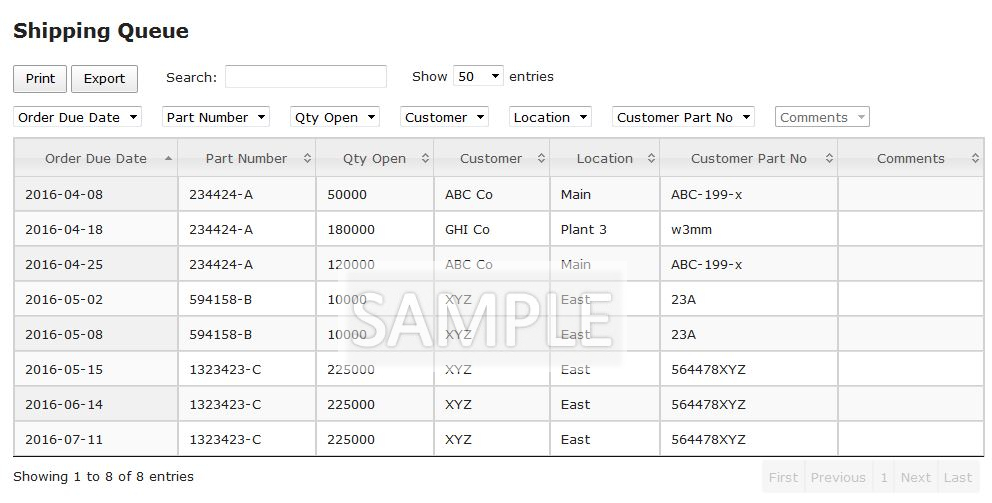
The Shipping Report is a read-only table. Shipments are created from the Shipments tab. Each item with an Open Quantity is listed, in ascending order of Order Due Date.
A brief description of each column in the table:
- Order Due Date: The date each line item is due to the customer.
- Part Number: Your internal part number that corresponds to the customer’s part number.
- Quantity Open: The quantity due for each line item.
- Customer: The customer name. We use the nickname you have given the customer for brevity.
- Location: The location the customer has designated for shipping. Again, the assigned nickname is used.
- Customer Part No: The customer’s part number as specified in their order.
- Comments: Any comments associated with the Order Line Item.
