
The Customers tab is where you will maintain your list of Customers, Locations, and Location / Parts.
Each Customer must have at least one Location listed. The Location / Part tab is where you list each of the parts they purchase at a given location.
Subtabs: Customers, Locations, Location/Part
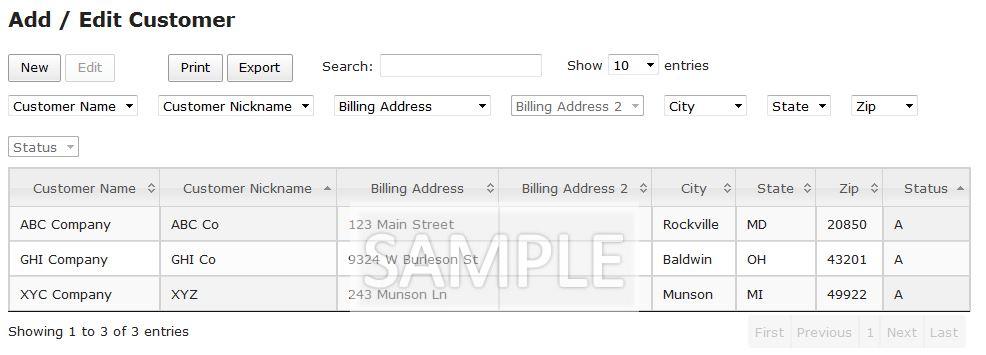
Customers
Table
Please see the Interacting with Tables section of this manual to learn how tables work. In this page, we will deal with the specific data in this table.
A brief review of the columns in the Customers table:
- Customer Name: The full-length name of your Customer.
- Customer Nickname: The shortened version of your Customers Name, displayed throughout PiQ.
- Billing Address: The address to which invoices will be sent for payment.
- Billing Address2: A second line of information for the Billing Address.
- City, State, Zip: The remaining address fields for this location.
- Status: The Status (Active or Inactive) for this customer.
Let’s move on to your interaction with the table:
- To create a new Customer:
- Click the “New” button, then follow the Form instructions below.
- To edit an existing Customer:
- Select the row you wish to edit, then click the “Edit” button. Follow the Form instructions below.
Now we’ll look at each button action individually:
Add a New Customer
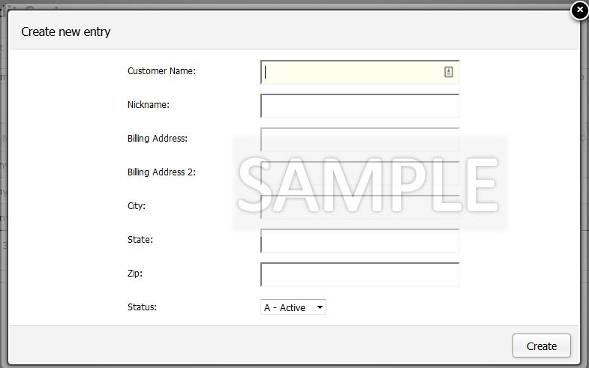
This is the Create new entry form to add a New Customer. For a description of each field, read the table column descriptions above.
- Customer Name: Input the full-length name of your Customer.
- Customer Nickname: Enter a shortened version of your Customers Name. This is limited to 8 characters, so be concise.
- Billing Address: Enter the address to which invoices will be sent for payment.
- Billing Address2: Enter any second line of information for the Billing Address.
- City, State, Zip: Enter the remaining address fields for this location.
- Status: New Customers are set to Active by default.
Once you have completed entering the data for this Customer, click “Create” and you’re all done! You will be returned to the table view, and your new line item will be momentarily highlighted in the table. Now you will need to go to the Locations tab to create a shipping
location for this customer.
To cancel the Entry and make no changes, click the “X” at the top right corner of the window, or hit “ESC” on your keyboard.
Edit an Existing Customer.
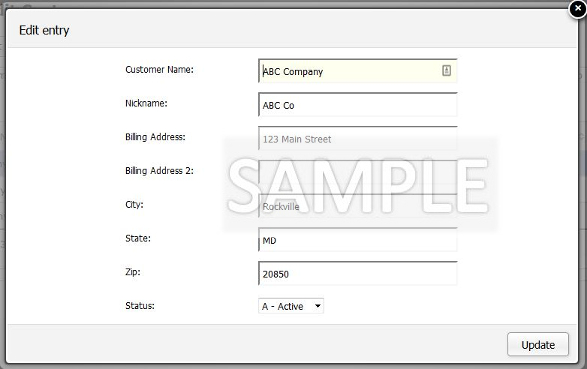
This is the Edit Entry form to edit an Existing Customer record. For a description of each field, read the Add a New Customer text above.
- To begin an Edit on an Existing Customer, first you must click on the table row you wish to edit. Once a row is highlighted, the Edit button will become active.
- The form will automatically populate with all of the information from the row you selected. Edit the field that you wish to change and click “Update” to complete the edit.
- Note: If you change a Customer from Active to Inactive status, you must also remember to Inactivate any Locations that correspond to that Customer.
- You will be returned to the table view, and your edited line item will be momentarily highlighted in the table.
- To cancel the Edit and make no changes, click the “X” at the top right corner of the window, or hit “ESC” on your keyboard.
A Customer, once established in PiQ, cannot be deleted (only moved to Inactive Status.) This is to preserve your history for this Customer.
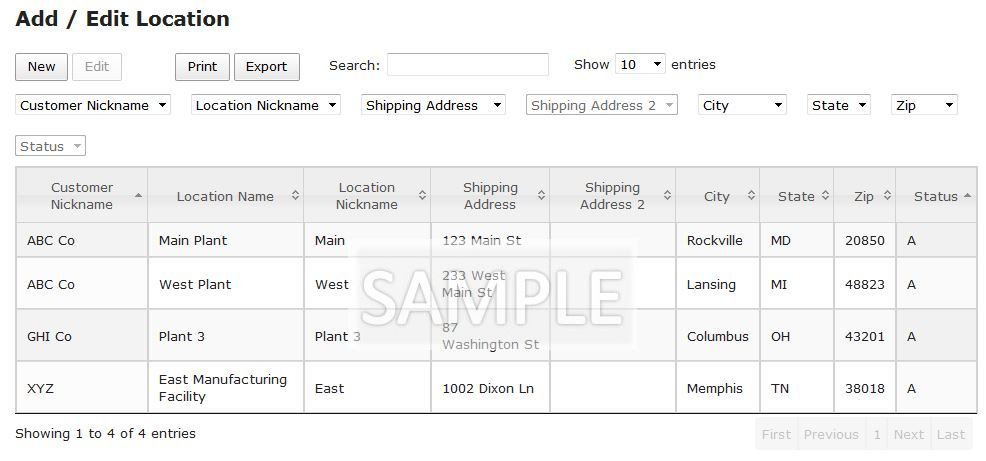
Locations
The Customer Locations tab is where you will assign one or more Shipping Locations for each Customer. At least one Shipping Location is required for each Customer.
Table
 Please see the Tables section on the General tab of this manual to learn how to interact with the tables. In this page, we will deal with the specific data in this table.
A brief review of the columns in the Customer Locations table:
- Customer Nickname: The Nickname you have assigned to your Customer.
- Location Name: The full-length name for this Customer Location.
- Location Nickname: The shortened version of your Customers Location Name, displayed throughout PiQ.
- Shipping Address: The address to which you will be shipping product.
- Shipping Address2: A second line of information for the Shipping Address.
- City, State, Zip: The remaining address fields for this location.
- Status: New Customer Locations are set to Active by default.
Let’s move on to your interaction with the table:
A Customer Location, once established, cannot be deleted (only set to Inactive Status.) This is to maintain your history for this Location.
Now we’ll look at each button action individually:
Add a New Customer Location
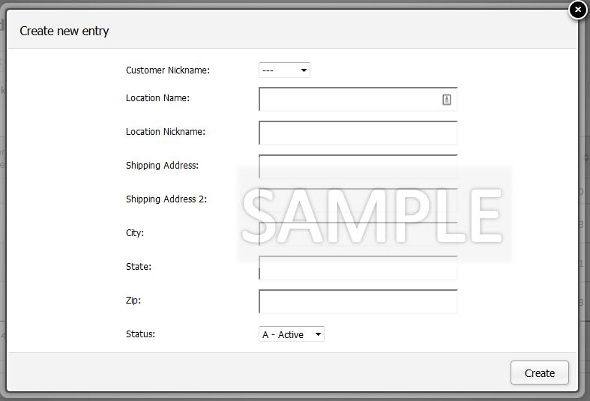
This is the Create new entry form to add a New Customer Location. For a description of each field, read the Table column descriptions above.
- Customer Nickname: Select the Customer Nickname for the Customer you will be adding this Location.
- Location Name: Enter the full-length name for this Customer Location.
- Location Nickname: Enter a shortened version of your Customers Location Name. The limit is 8 characters, so be concise.
- Shipping Address: Enter the address to which you will be shipping product.
- Shipping Address2: Enter any second line of information for the Shipping Address.
- City, State, Zip: Enter the remaining address fields for this location.
- Status: New Customer Locations are set to Active by default.
Once you have completed entering the data for this Customer Location, click “Create” and you’re all done! You will be returned to the table view, and your new line item will be momentarily highlighted in the table.
To cancel the Entry and make no changes, click the “X” at the top right corner of the window, or hit “ESC” on your keyboard.
You are now ready to enter a Customer Location Part so you can enter orders for this location. See instructions below.
Edit an Existing Customer Location.

- To begin an Edit on an Existing Customer Location, first you must click on the table row you wish to edit. Once a row is highlighted, the Edit button will become active.
- The form will automatically populate with all of the information from the row you selected. Edit the field that you wish to change and click “Update” to complete the edit. You will be returned to the table view, and your edited line item will be momentarily highlighted
in the table. - To cancel the Edit and make no changes, click the “X” at the top right corner of the window, or hit “ESC” on your keyboard.
A Customer Location, once established, cannot be deleted (only set to Inactive Status.) This is to maintain your history for this Location.
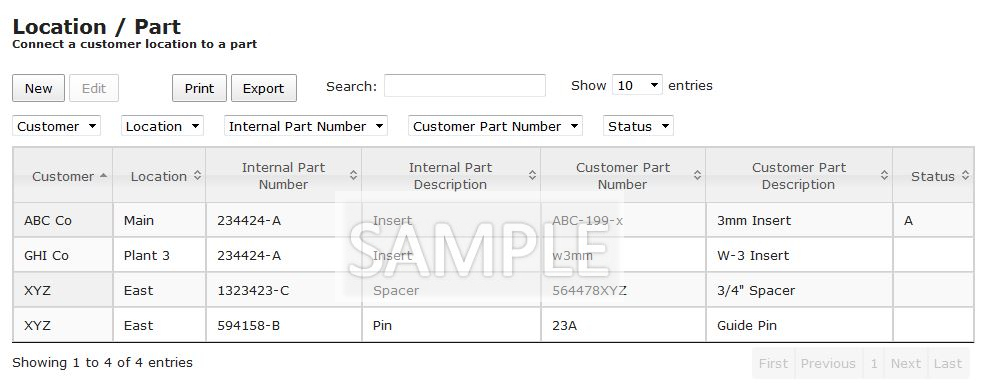
Location / Part
The Location / Part Table is where you will assign each part purchased by this Customer to be shipped to this Location.
Each Customer / Location / Part is a unique record in PiQ.
Table
 Please see the Tables section on the General tab of this manual to learn how to interact with the tables. In this page, we will deal with the specific data in this table.
A brief review of the columns in the Location / Part table:
- Customer: The Nickname you have assigned to your Customer.
- Location: The Nickname you have assigned to this Customer Location.
- Internal Part Number: Your part number to be shipped to this Customer Location.
- Internal Part Description: Your description of the part.
- Customer Part Number: The Part Number used by this Customer Location.
- Customer Part Description: The description of the part used by this Customer Location.
- Status: Active for parts they currently purchase, Inactive for parts no longer purchased.
Let’s move on to your interaction with the table:
A Location / Part, once established, cannot be deleted (only set to Inactive Status.) This is to maintain your history for this Location / Part.
Now we’ll look at each button action individually:
Add a New Location / Part
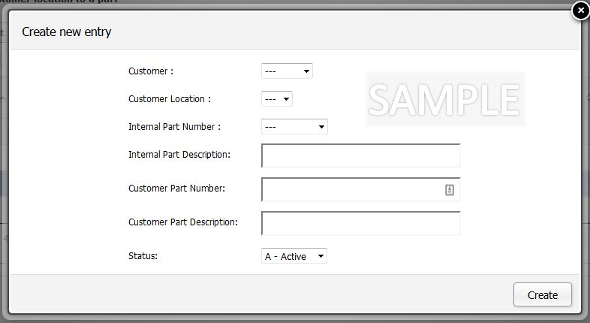
This is the Create new entry form to add a New Location / Part. For a description of each field, read the Table column descriptions above.
- Customer: Select the Customer Nickname you have assigned to your Customer.
- Location: Select the Nickname you have assigned to this Customer Location.
- Internal Part Number: Select the part number to be shipped to this Customer Location.
- Internal Part Description: This will auto-populate when you select the Internal Part Number.
- Customer Part Number: Input the Part Number used by this Customer Location.
- Customer Part Description: Input the description of the part used by this Customer Location.
- Status: New Location / Parts are set to Active by default.
Once you have completed entering the data for this Location / Part, click “Create” and you’re all done! You will be returned to the table view, and your new line item will be momentarily highlighted in the table.
To cancel the Entry and make no changes, click the “X” at the top right corner of the window, or hit “ESC” on your keyboard.
You are now ready to create an order for this Customer Location Part on the Orders tab.
Edit an Existing Location / Part.
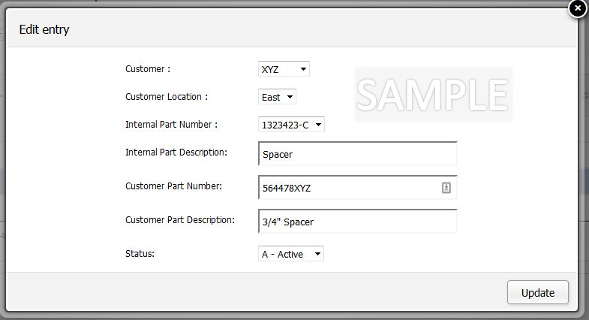
- To begin an Edit on an Existing Location / Part, first you must click on the table row you wish to edit. Once a row is highlighted, the Edit button will become active.
- The form will automatically populate with all of the information from the row you selected. Edit the field that you wish to change and click “Update” to complete the edit. You will be returned to the table view, and your edited line item will be momentarily highlighted
in the table. - To cancel the Edit and make no changes, click the “X” at the top right corner of the window, or hit “ESC” on your keyboard.
A Location / Part , once established, cannot be deleted (only set to Inactive Status.) This is to maintain your history for this Location / Part.
